
Staff Security controls how you and your staff sign in to Garage Invoice. The settings apply to everyone who signs in to the admin area, including you. For Customer Portal logins, see Customer Security.
Before you change anything: make sure you can still sign in afterwards. Set up your own passkey or two-factor authentication first, keep your email address up to date, and tell your team before you turn on a stricter option. If you’re not sure, change one option at a time.
Open Staff Security
- Click Settings at the bottom of the sidebar, under Administration.
- In the panel on the left, open Staff & Access and click Staff Security.
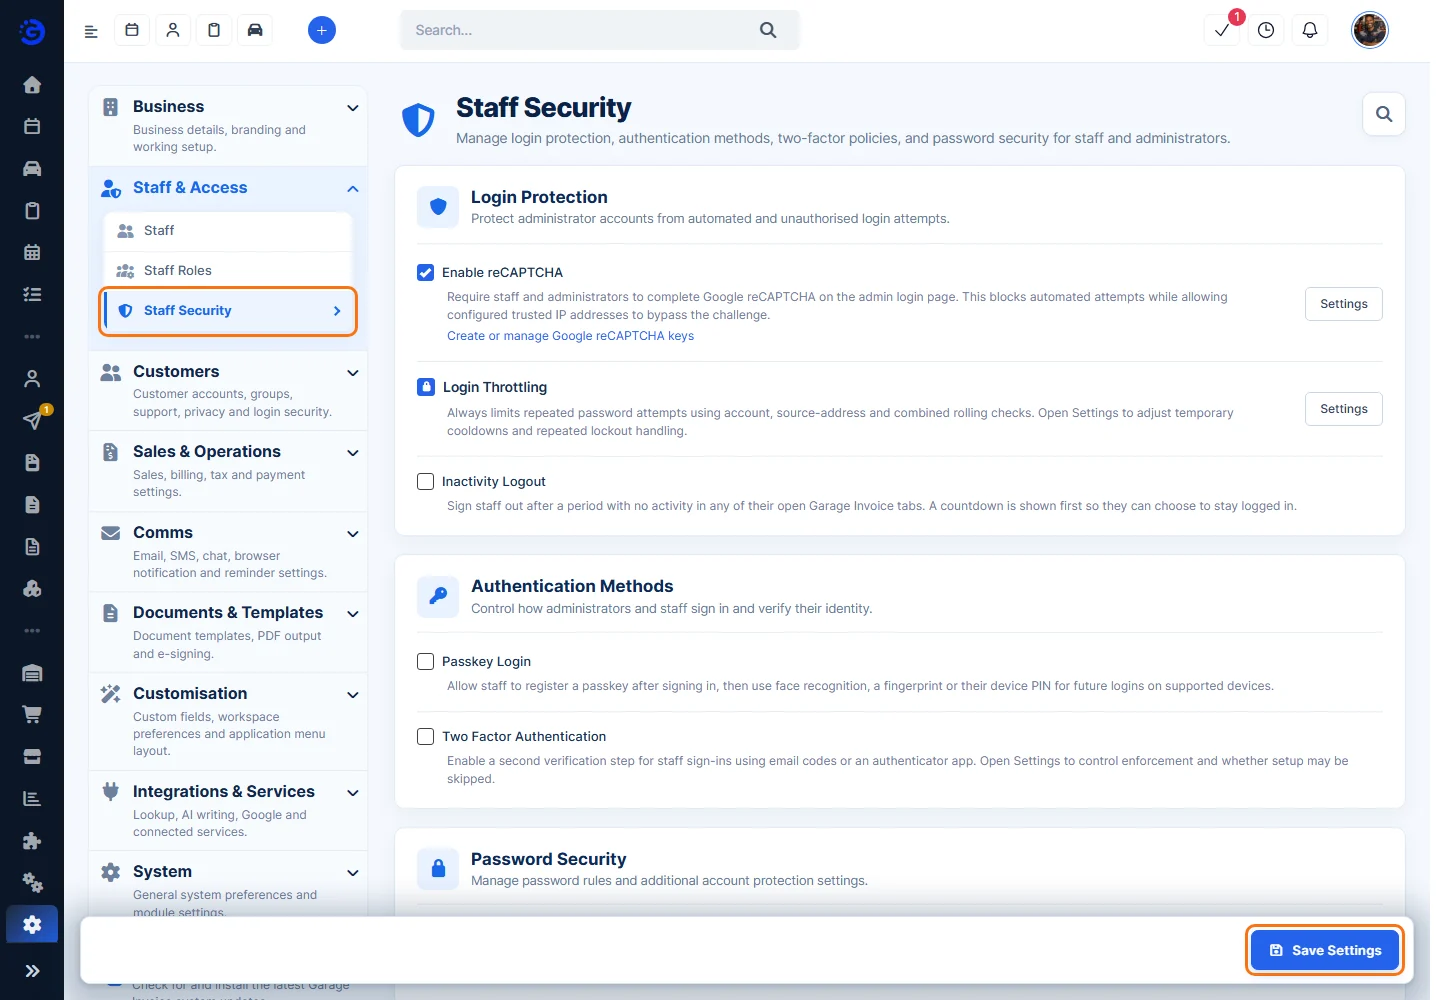
- Tick an option to turn it on. Some options open their settings window straight away; others show a Settings button.
- Click Save Settings at the bottom right to apply your changes. To discard changes you haven’t saved, reload the page.
The options are in three groups: Login Protection, Authentication Methods and Password Security.
Enable reCAPTCHA
Staff and administrators must tick Google’s “I’m not a robot” checkbox on the admin login page before they can sign in. This stops automated programs trying passwords over and over.
- Tick Enable reCAPTCHA and click its Settings button.
- In reCAPTCHA Settings:
- Site Key: the public key from Google. The login page uses it to show the checkbox.
- Secret Key: the private key the server uses to check each answer. Click Show to see what you typed. Keep it private.
- Trusted IP Addresses: office or server IP addresses that can sign in without the checkbox. Separate them with commas. Only add fixed (static) addresses that you control and trust.
- Validate reCAPTCHA: once both keys are entered, a test checkbox loads here. Complete it to check the keys work.
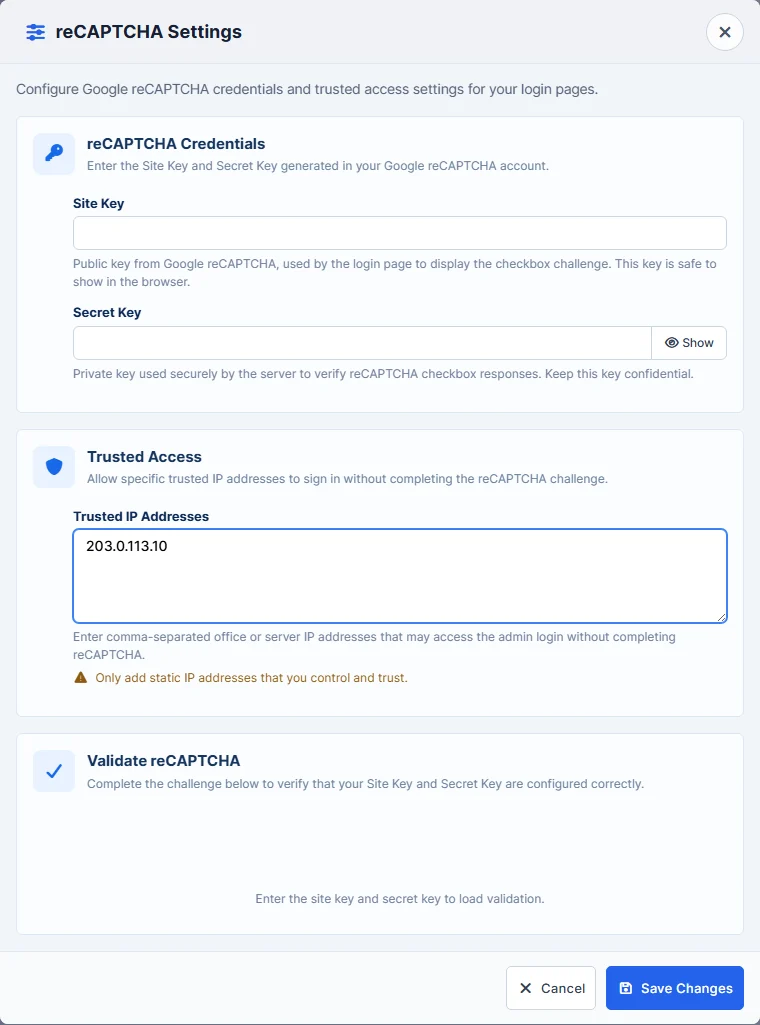
- Click Save Changes, then Save Settings at the bottom of the page.
Get your Google reCAPTCHA keys
Click Create or manage Google reCAPTCHA keys under the option. The window lists the steps:
- Open Google reCAPTCHA Admin (you need a Google account).
- Enter a label, for example Garage Invoice Admin Login.
- Under reCAPTCHA type, choose Challenge (v2) and then “I’m not a robot” Checkbox.
- Under Domains, enter the web address of your Garage Invoice app (for example yourgarage.garageinvoice.co.uk).
- Accept the reCAPTCHA Terms of Service and click Submit.
- Copy the Site Key and Secret Key into the reCAPTCHA Settings window.
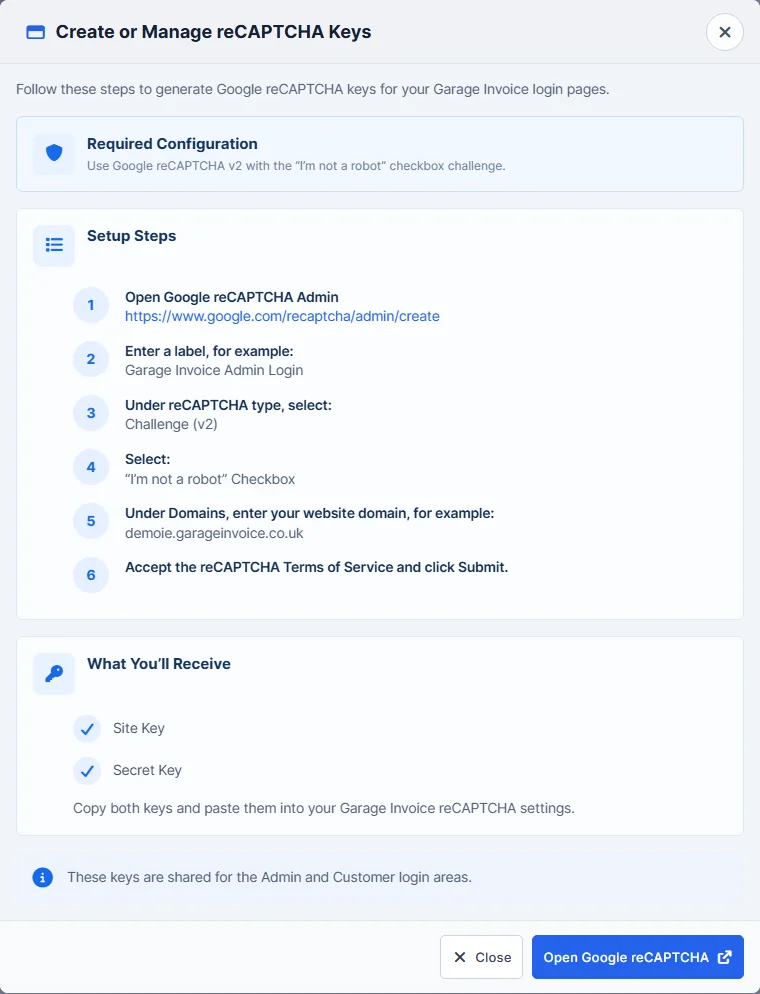
Note: the same keys are used for the staff login and the Customer Portal login. Changing them on one page changes them for both.
Tip: check the keys with Validate reCAPTCHA before you save. A wrong key or a missing domain can stop the checkbox loading on the login page.
Login Throttling
Login Throttling is always on. It limits repeated wrong passwords by checking the account, the address the attempt comes from, and both together. After too many wrong passwords, sign-in is blocked for a while. Accounts are never locked for good automatically.
- Click Settings next to Login Throttling.
- Choose:
- Failed Attempts Before Lockout: how many wrong passwords are allowed before sign-in is blocked (5 by default).
- First Lockout Duration: how many minutes the first block lasts (30 by default).
- Repeated Lockout Duration: Keep the same duration every time, or Double after each lockout so repeated attempts are blocked for longer. Lockout progression shows the result, for example 30 minutes for the 1st lockout and 60 minutes for the 2nd and later.
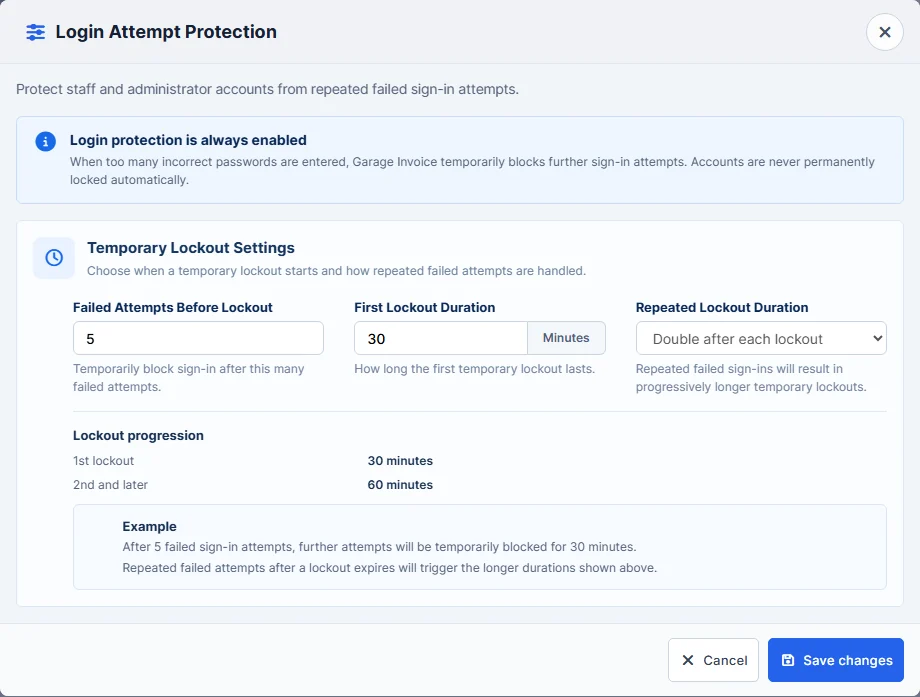
- Click Save changes, then Save Settings.
Tip: to see who has tried to sign in and whether anyone is locked out, see Login Attempts.
Inactivity Logout
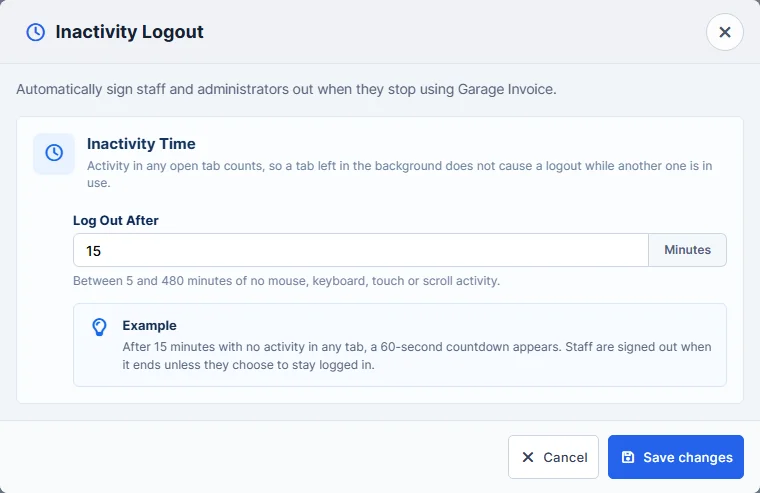
Signs staff out when they stop using Garage Invoice. Activity in any open tab counts (mouse, keyboard, touch or scrolling), so a tab left in the background doesn’t log them out while they work in another one.
- Tick Inactivity Logout. The settings window opens.
- Enter Log Out After: the number of minutes with no activity, between 5 and 480.
- Click Save changes, then Save Settings.
When the time is up, a 60-second countdown appears. Staff are signed out when it ends unless they choose to stay logged in. If you click Cancel in the window, the option is unticked again.
Note: unsaved work, such as a half-filled invoice, may be lost when someone is signed out. Choose a time that suits how your workshop works, for example longer for a shared reception PC that is used on and off all day.
Passkey Login
A passkey lets a staff member sign in with their face, fingerprint or device PIN instead of typing a password. It works on supported devices, for example a computer, phone or tablet that unlocks with face recognition, a fingerprint or a PIN.
- Tick Passkey Login.
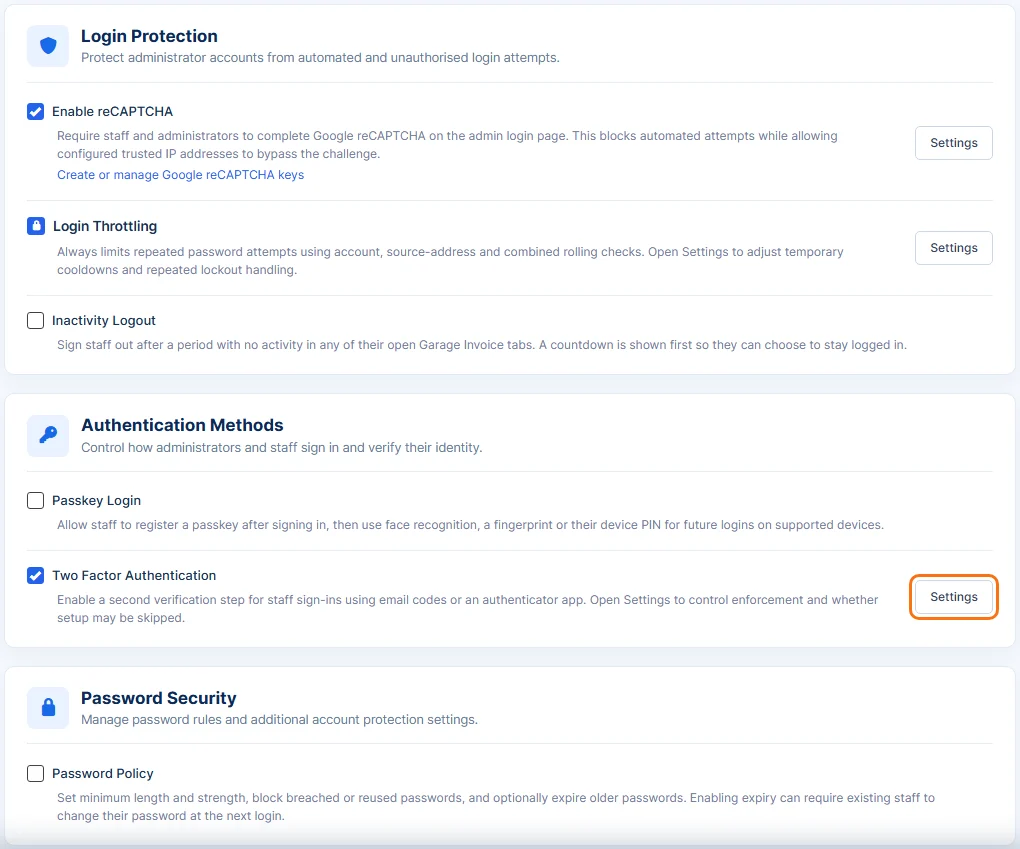
- Garage Invoice saves this straight away and asks you to create a passkey for your own account on the device you’re using. Follow your browser’s or device’s prompt (for example, scan your fingerprint).
- If you cancel the prompt or the device can’t create a passkey, Passkey Login is turned off again.
Once it’s on, each staff member can register a passkey after signing in, then use it for future logins on that device.
Note: a passkey belongs to the device it was created on. If a staff member gets a new phone or computer, they need to register a passkey on it.
Two Factor Authentication
Adds a second step when staff sign in: as well as their password, they enter a code sent by email or shown in an authenticator app.
- Tick Two Factor Authentication and click its Settings button.
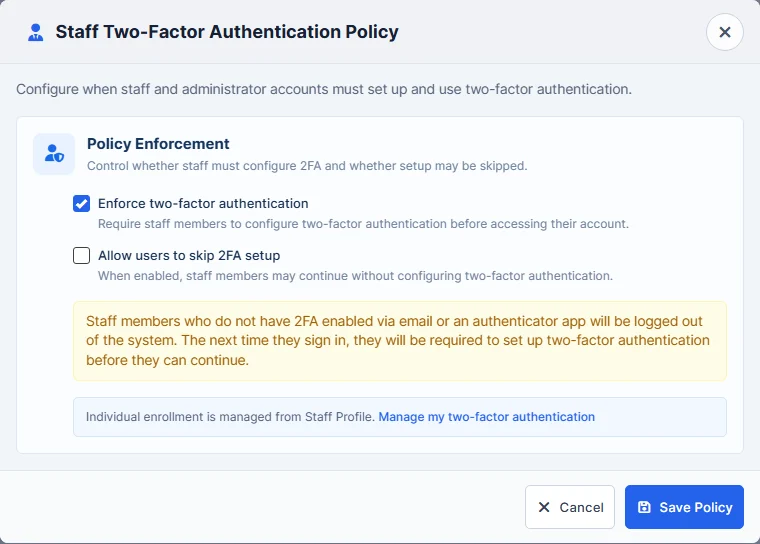
- In Staff Two-Factor Authentication Policy, choose:
- Enforce two-factor authentication: staff must set up two-factor authentication before they can use their account. If you leave this unticked, two-factor authentication is available but optional.
- Allow users to skip 2FA setup (shown when enforcing): staff may carry on without setting it up.
- Click Save Policy, then Save Settings.
Each staff member sets up their own method (email or authenticator app) on their profile. Click Manage my two-factor authentication in the window to open yours.
Important: when you enforce two-factor authentication, staff members who haven’t set it up are logged out. The next time they sign in, they must set it up before they can continue. Set up your own first, and make sure every staff member can get to their email or authenticator app.
Password Policy
Sets the rules for staff and administrator passwords. Tick Password Policy and the Password Policy Settings window opens.
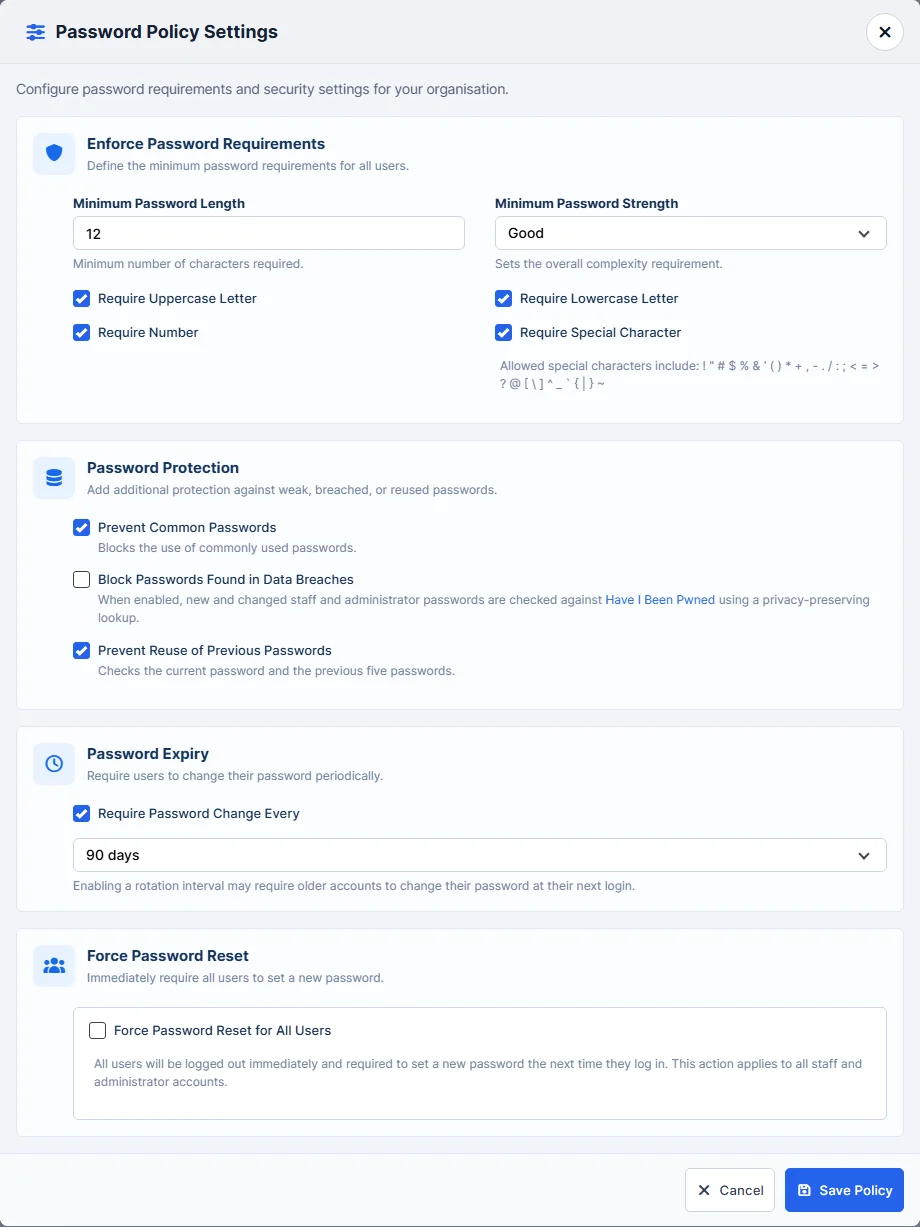
- Minimum Password Length: the fewest characters a password can have (12 by default).
- Minimum Password Strength: Weak, Fair, Good or Strong. Sets how complex a password must be overall.
- Require Uppercase Letter, Require Lowercase Letter, Require Number and Require Special Character: what every password must contain. The window lists the special characters that count.
- Prevent Common Passwords: blocks passwords that many people use.
- Block Passwords Found in Data Breaches: new and changed passwords are checked against Have I Been Pwned, a list of passwords leaked in data breaches. The check uses a privacy-preserving lookup.
- Prevent Reuse of Previous Passwords: a new password can’t be the same as the current one or the previous five.
- Require Password Change Every: makes passwords expire after 30, 60, 90, 180 or 365 days. When you turn this on, staff with older passwords may have to change them the next time they sign in.
- Force Password Reset for All Users: signs out all staff and administrator accounts straight away. Everyone must set a new password the next time they sign in. This includes you.
Click Save Policy, then Save Settings. If you click Cancel, the option is unticked again.
Note: the rules apply when a password is set or changed. Use Force Password Reset for All Users only when you mean it, for example after a security problem: it signs everyone out, including anyone in the middle of a job.
Related
Customer Security · Login Attempts · Add New Staff Member · Change your password